My name is Jillian Berube and I am a freshman at SBRHS. I am currently taking Engineering Design, taught by Mr. Ramos. On this website I will post pictures and information about the current projects we will be designing.

SAFETY TRAINING
For the first month of engineering design, we were taught how to use the tools safetly. We used the bandsaw, table saw, the jointer, drill press, combound miter saw and a lot more. We had a deminstration for each tool so we could use them properly. At the end of the month, we had to take a safety exam and every one passed it. We have ten rules to follow at all times:
For the first month of engineering design, we were taught how to use the tools safetly. We used the bandsaw, table saw, the jointer, drill press, combound miter saw and a lot more. We had a deminstration for each tool so we could use them properly. At the end of the month, we had to take a safety exam and every one passed it. We have ten rules to follow at all times:
MAGNET PROJECT
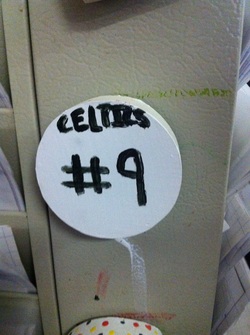
Our first project was the magnet project. To start this project you needed to know how to use certain tools and machines like the bandsaw and sander. We had to draw six different designs and show them to Mr. Ramos. We could choose our favorite one, and mine was: Celtics, number 9. At first I was going to put a clover, but then I decided to do #9 because Rajon Rondo is my favorite player. After we made our designs and it was approved by Mr. Ramos, we went off to work. The magent could be no bigger than 4 inchs wide, because it had to fit on the file tower. It had to be made out of wood or styrofoam. After measuring your magnet the right size and shapping it to what you wanted, you could begin painting. I painted mine white and green because of the Celtics. Since you only had two classes to do it, you had to use the dryer to dry the paint faster. I had to repaint my magnet two times because of way it dried and because i changed my design in the middle of the process. But, overall it came out okay. Some suggestions I had was to paint the magnet
with two coats of whites because you could still see some of my
mistakes. What I would do differently if we could do this project
again was make my magnet in the shape of the number 9 and paint
it with white and green stripes.
RUBIX CUBE
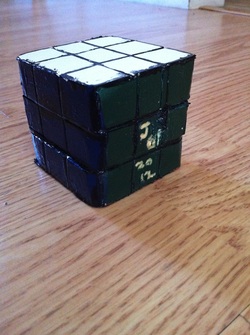
Our next project was the rubix cube. We needed to know how to use the bandsaw, sander, and the dremmle. Before starting this project we had to draw a series isometric and oblique drawings. We needed to draw the rubix cube as a isometric drawing and show it to Mr. Ramos. Our first step in completing the rubix cube was to cut three squares of wood 2 1/4in by 2 1/4in and glue them together. Second, we had to cut slits into the wood to make indents of the outlines of the smaller squares measuring 3/4 of an inch. After, we had to paint them the colors of the originial rubix cube and use the dremel to carve in our initials. Mr. Ramos was very helpful when we drawing the isometric and oblique drawings because I had trouble with drawing the different angles. I thought that this project was fun and that maybe next time, we could make each section turn.
Our next project was the rubix cube. We needed to know how to use the bandsaw, sander, and the dremmle. Before starting this project we had to draw a series isometric and oblique drawings. We needed to draw the rubix cube as a isometric drawing and show it to Mr. Ramos. Our first step in completing the rubix cube was to cut three squares of wood 2 1/4in by 2 1/4in and glue them together. Second, we had to cut slits into the wood to make indents of the outlines of the smaller squares measuring 3/4 of an inch. After, we had to paint them the colors of the originial rubix cube and use the dremel to carve in our initials. Mr. Ramos was very helpful when we drawing the isometric and oblique drawings because I had trouble with drawing the different angles. I thought that this project was fun and that maybe next time, we could make each section turn.
HYDROPONICS
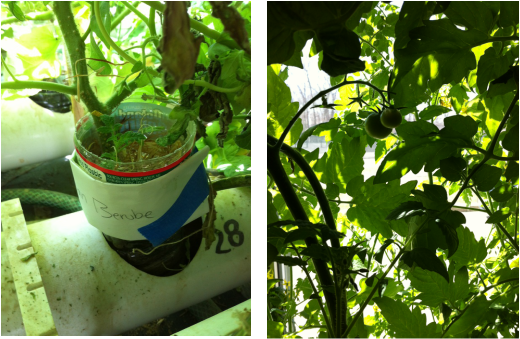
Our last project in term 1 was starting our hydroponic plants. It will be growing for the rest of the year. What we had to do was bring in a water bottle from home, cut the top of the bottle off and make three holes next to the bottom so water can flow in and out. After that, we had to use the grater to produce the filling in the cup. We placed two tomato seeds in the cup and put a tube in one of the holes. The top of the bottle was used to press down on the wood shavings, until there was a stem for our plant. The wood shavings in the cup absords the water and the rest of the water seeps out of the other two holes. We had to chose a spot near the window where you wanted your plant. What i would have done differently was I would have pick a place right in front of the window so it could grow faster and stronger with the sun shinning on it.
