Box of Blocks
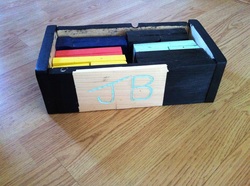
Our first project in term two was a box of blocks. We recieved a paper that had six different pictures of pieces of wood including the measurements. We had to measure each piece of wood according to the picture. After we cut and sanded the six different pieces of wood, we had to paint them. We had to do this for each of the six designs. There were pieces missing to make it a perfect rectangle. We had to cut and measure a piece that would complete the rectangle. Next, we had to make a box to fit them all. My box measured 6 1/2 by 11 inches. After I glued the four
sides of my box together, I used the dremmle and craved my initials. I painted the box blue and the initias green. I learned how to engrave my initials with a dremmle. What I would have done differently was I would have redoned the missing part because they don't exactly fit.
sides of my box together, I used the dremmle and craved my initials. I painted the box blue and the initias green. I learned how to engrave my initials with a dremmle. What I would have done differently was I would have redoned the missing part because they don't exactly fit.
Truss Challenge

To build and design a truss, you needed to know the different types of pressure. Two of them are torsion and compression. The first step was to draw six different designs on graph paper and chose between you and your partner which one would support the most weight. We then had to strip pieces of wood, measure and cut them to fit our design. Then, we had to cut four more pieces of wood to cover the sides of the base and the top. After the truss was built, Mr. Ramos applied pressure to the truss and ours held over 100 pounds of pressure. Lastly, we had to complete a paper with questions on it and pass it in as a grade. What I would have done differently was maybe try a design and see how that comes out.
Bridge
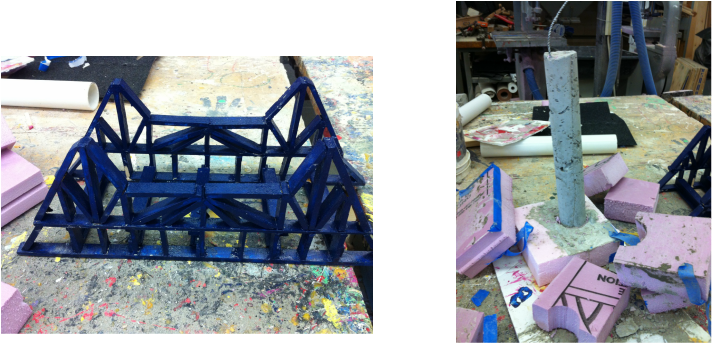

Our next project in term 2 was the 12-day bridge challenge. This was a partner project; my partner was Megan Costa. Before starting this project, you needed to know how to use the bandsaw and sander and know how to make concrete. The first step in creating this bridge was to draw out a design of the bridge you wanted to build. You would want to build your bridge in shapes of triangle because they are the strongest. After you drew your design, you had to measure and cut each piece of wood. After that, you had to create another side identical to the other and create eye-beams to connect the two sides. Lastly, you had to put the road in. You just had to cut a piece of tar paper and paint yellow lines in the middle of it. After the creatation of the bridge you had to make concrete columns. You had to cut out two squares of pink foam and put a pipe into it and fill it with concrete. Then, we made a square out of foam, put it around the pipe and filled that with concrete. After the concrete dried for 24 hours, we took the pipe and the pink foam off and place the bridge on top and our bridge was complete. If I would do this project again, I would create a new bridge design.
Concrete Letters
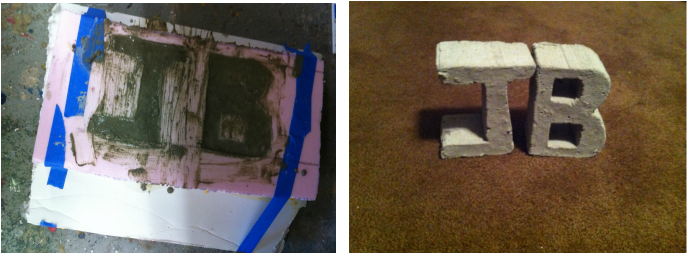
Our last project in term two was concrete letters. To start this project, I had to draw out my initials in block letters on graph paper. Then, I measured out the dimensions on pink foam. Next, I used the bandsaw to cut out the insides of my letters. I glued the pink foam to a poster board. I had to make concrete by mixing the concrete with water and then I filled my letters with that. You had to tap the sides of the pink foam so you wouldn't get ay air bubbles in your concrete. After 24 hours, I took the pink foam off and my letters were all dry. What I would have done differently was make sure my letter "J" was even at the top because the top was uneven.
